Item Adjustment
Item > Item Adjustment
Item Adjustments are done to record an increase or decrease in quantity of an item outside of day-to-day inventory processes: Item Receipt, Item Fulfillment, Production Record Inventory Deduction.
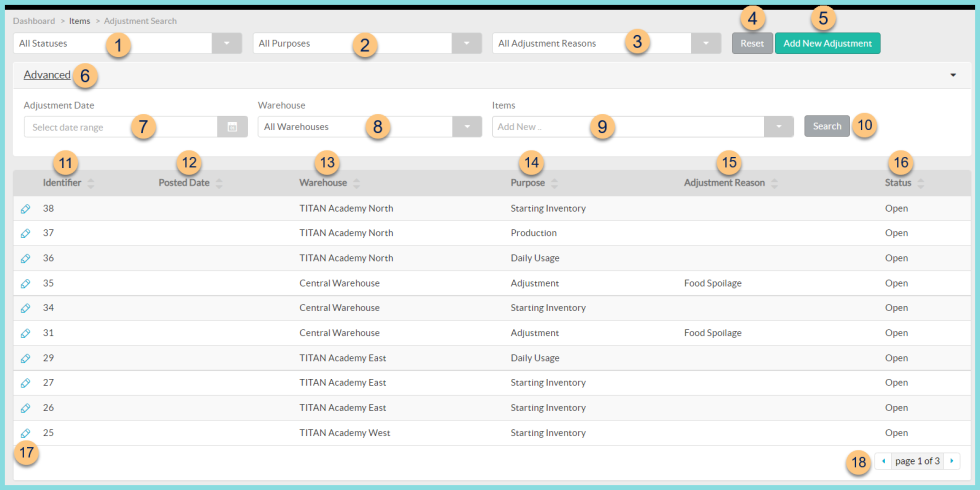
Item Adjustment Screen
-
All Statuses - filter by adjustment status (All Statuses, Completed, Open)
-
All Purposes - filter by adjustment purpose (All Purposes, Adjustment, Starting Inventory, Daily Usage, Production)
-
All Adjustment Reasons - filter by adjustment reason (All Adjustment Reasons, Food Spoilage, Custom Adjustment Reasons)
-
Reset - click to reset search parameters
-
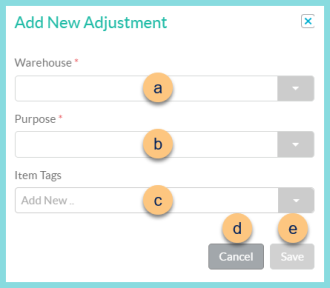
Add New Adjustment - click to add an adjustment
-
Warehouse - choose the warehouse for this adjustment. Note: If the user's security role only applies to one building, that building will be automatically populated.
-
Purpose - select the adjustment purpose
Adjustment - choose this purpose to SUBTRACT product that has been physically removed from inventory for an Adjustment Reason, then select the Adjustment Reason (not pictured)
Daily Usage - choose this purpose to SUBTRACT product that has been used for daily operations but will not be deducted from a production record
Production - choose this purpose to ADD finished goods to inventory
Starting Inventory - choose this purpose to ADD a site's initial starting inventory -
Item Tags - select item tag(s) that should pre-populate on the item adjustment. Note: All items with the selected item tag(s) will appear on the item adjustment.
-
Cancel - click to return to the previous screen without creating a new adjustment
-
Save - click to create the adjustment and be redirected to the Individual Adjustment Screen
-
Advanced - click to open additional filters
-
Adjustment Date - filter by adjustment date range
-
Warehouse - filter by warehouse
-
Items - filter by inventory item
-
Search - click to apply advanced filters
-
Identifier - click to sort by adjustment identifier
-
Posted Date - click to sort by posted date
-
Warehouse - click to sort by warehouse
-
Purpose - click to sort by adjustment purpose
-
Adjustment Reason - click to sort by adjustment reason
-
Status - click to sort by status
-
Pencil - click to be redirected to the individual adjustment screen
-
< > - click to scroll through pages
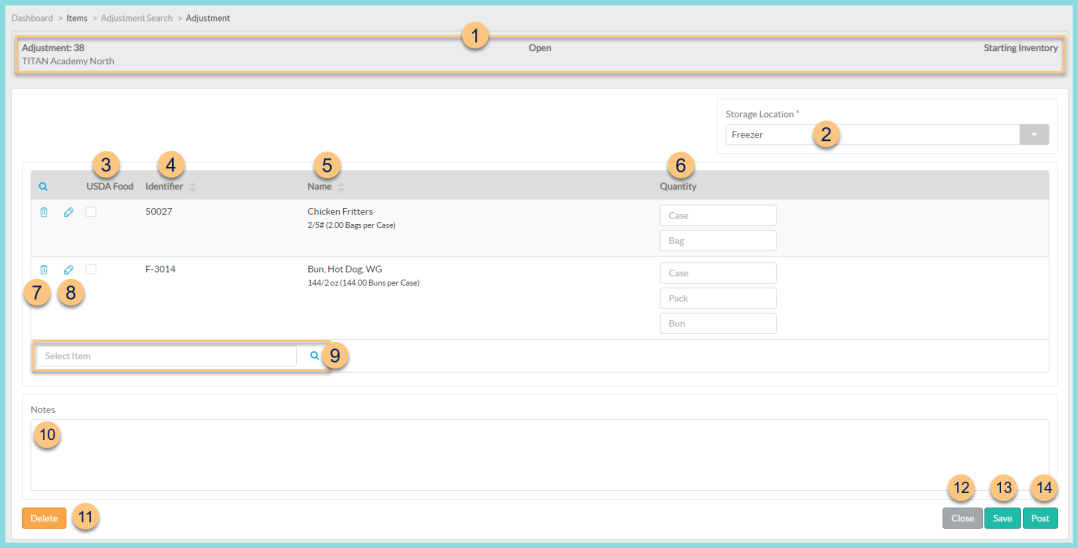
Individual Item Adjustment
-
Notice the Adjustment Number, Warehouse, Status, and Purpose
Print Adjustment Results (not pictured, Posted status only) - click to request a report of adjustment results -
Storage Location (Starting Inventory or Production Purposes only) - change the Storage Location if needed
Adjustment Reason (not pictured, Adjustment purpose only) - change the Adjustment Reason if needed -
USDA Food (Starting Inventory purpose only) - check to indicate USDA Food status and apply USDA value in reporting
-
Identifier - click to sort by item Identifier
-
Name - click to sort by Item Name. Notice the number of Base Units of Measure per Preferred Unit of Measure
-
Quantity - enter the quantity of each physical count unit of measure. This amount will be added to inventory if the Purpose is Starting Inventory or Production. This amount will be subtracted from inventory if the Purpose is Adjustment or Daily Usage.
Sub-Location (not pictured, Starting Inventory and Production Purposes only, sub-locations enabled only) - select the sub-location and sub-sub-location(s) as applicable. -
Trash Can - click to remove the item from the adjustment
-
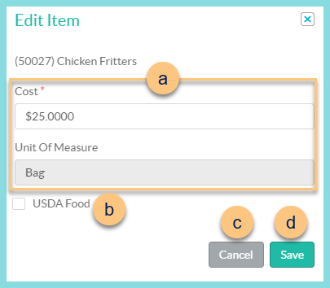
Pencil (starting inventory and production purposes only) - click to edit details
-
Cost - adjust the cost per displayed Unit of Measure if needed. The purchasing cost is the default value.
-
USDA Food (Starting Inventory and Production purposes only) - check to indicate USDA Food status and apply USDA value in reporting
-
Cancel - click to return to the previous screen without saving changes
-
Save - click to save changes
-
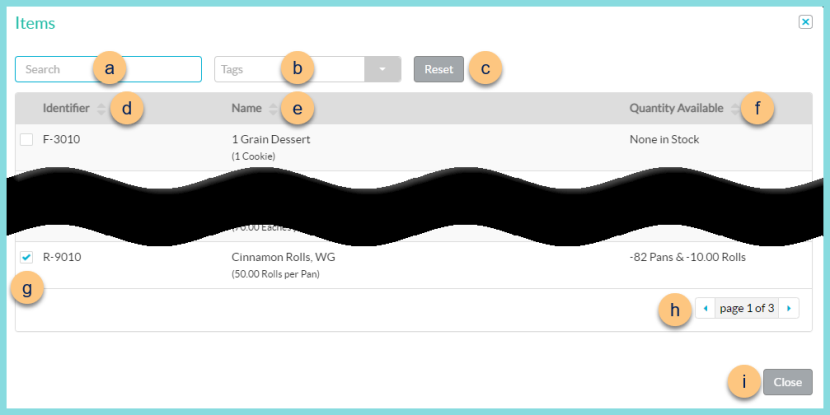
Search Items - search for items or click the Magnifying Glass to add inventory items to the adjustment
-
Search - search for inventory items permitted to be used at the selected warehouse
-
Tags - filter by item tags
-
Reset - click to reset filters
-
Identifier - click to sort by identifier
-
Name - click to sort by name
-
Quantity Available - click to sort by the on hand quantity
-
Checkbox - check to add item to adjustment
-
< > - click to scroll through pages
-
Close - click to return to the adjustment screen with added items
-
Notes - enter notes as needed. Notes are an available field in the Inventory Data Report.
-
Delete - click to delete this item adjustment
-
Close - click to return to the previous screen without saving changes
-
Save - click to save this adjustment for additional work later
-
Post - click to Post the Item Adjustment. Product will be added or subtracted when posting is complete.